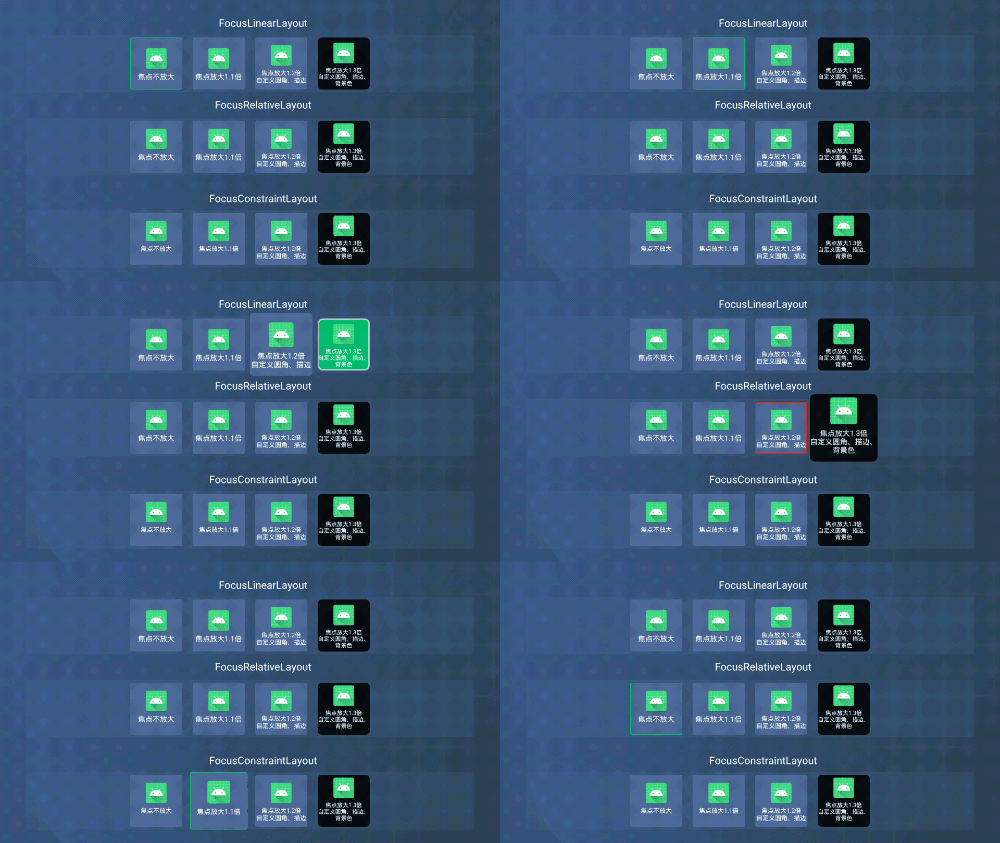
工程 Github 地址:
https://github.com/TowerYe/AndroioTvFocusLayer
效果图:
用的 Android Studio 的 TV 虚拟机录制的,有点卡,在小米,天猫盒子上试过是不会出现这种卡顿的效果的。
一、前言   最近在负责一款 Android TV 的项目,由于是第一次接触电视端的项目,最开始是打算直接采用谷歌官方的 Leanback 那套框架来开发,但是由于相关 UI 过于封闭,不易自定义,所以就放弃了。电视端相较于手机端的 APP,最大的区别就是交互方式,电视端不能像手机 APP 那样直接通过触碰点击,而必须要通过遥控器去交互,这就涉及到电视端的相关控件的焦点问题。
  在电视或一些电视盒子上,通常 View 在获取焦点时就会有个放大的效果,同时会有一个边框,以此来提示用户这个 View 是当前被选中的 View,为了实现这个效果,最开始在网上搜了下,发现都比较复杂,大部分都是在自定义 View 通过 Paint 那一套来自己画啊什么的,我嫌麻烦,最后就自己用相对简单的方式来实现,主要就是通过实现 OnFocusChangeListener 监听器来获取焦点变化状态,再在布局文件中通过 clipChildren 以及 clipToPadding 两个属性来让控件可以超出父布局来进行绘制,再动态创建不同焦点下的 Shape 图形,以此来达到最终的目的。
二、属性介绍
名称
类型
说明
isScale
boolean
获取焦点后是否放大
scaleSize
float
获取焦点后需放大的倍数
layerRadius
float
圆角大小
contentBgColor
int
内容背景色
focusContentBgColor
int
获取焦点时内容背景色
focusStrokeColor
int
获取焦点时的边框颜色
focusStrokeWidth
int
获取焦点时的边框的宽度
三、具体使用   对布局中常用的 LinearLayout,RelativeLayout,ConstraintLayout 进行了重新封装,可根据自己的习惯引入对应的 layout 进行布局,具体对应关系如下:
原生 Layer
焦点 Layer
LinearLayout
FocusLinearLayout
RelativeLayout
FocusRelativeLayout
ConstraintLayout
FocusConstraintLayout
  具体使用如下:
FocusLinearLayout
<com.tt.focuslayer.widget.FocusLinearLayout android:layout_width ="100dp" android:layout_height ="100dp" android:layout_marginStart ="20dp" android:gravity ="center" android:orientation ="vertical" focus:contentBgColor ="@color/black_80" focus:focusContentBgColor ="@color/green" focus:focusStrokeColor ="@color/white_60" focus:focusStrokeWidth ="3" focus:layerRadius ="8" focus:scaleSize ="1.3" > . . . </com.tt.focuslayer.widget.FocusLinearLayout >
FocusRelativeLayout
<com.tt.focuslayer.widget.FocusRelativeLayout android:layout_width ="100dp" android:layout_height ="100dp" android:layout_marginStart ="20dp" android:layout_toEndOf ="@+id/layer2" focus:focusStrokeColor ="@color/colorPrimary" focus:focusStrokeWidth ="2" focus:layerRadius ="4" focus:scaleSize ="1.2" > . . . </com.tt.focuslayer.widget.FocusRelativeLayout >
FocusConstraintLayout
<com.tt.focuslayer.widget.FocusConstraintLayout android:layout_width ="100dp" android:layout_height ="100dp" app:layout_constraintBottom_toBottomOf ="parent" app:layout_constraintEnd_toStartOf ="@+id/layer2" app:layout_constraintStart_toStartOf ="parent" app:layout_constraintTop_toTopOf ="parent" focus:isScale ="false" > . . . </com.tt.focuslayer.widget.FocusConstraintLayout >
  如果相应的 layer 在获取焦点放大时,View 被裁切没有显示完整,此时需要在布局文件的根 View 中加上如下的代码:
<androidx.constraintlayout.widget.ConstraintLayout xmlns:android ="http://schemas.android.com/apk/res/android" xmlns:app ="http://schemas.android.com/apk/res-auto" xmlns:focus ="http://schemas.android.com/apk/res-auto" android:layout_width ="match_parent" android:layout_height ="match_parent" android:clipChildren ="false" android:clipToPadding ="false" >
  核心代码就是
android:clipChildren="false"
android:clipToPadding="false"
  这二者的作用就是允许子 View 在进行绘制的时候是否可以超出父布局的边界进行绘制,默认是不允许的,所以没加该代码时,会导致 View 在获取焦点放大时被裁切以致显示不完整。
  相关源码注释:
<!-- Defines whether a child is  limited to draw inside of its bounds or not.
             This is useful with animations that scale the size of the children to more
             than 100% for instance. In such a case, this property should be set to false
             to allow the children to draw outside of their bounds. The default value of
             this property is true. -->

<attr name="clipChildren" format="boolean" />

<!-- Defines whether the ViewGroup will clip its children and resize (but not clip) any
             EdgeEffect to its padding, if padding is not zero. This property is set to true by
             default. -->

<attr name="clipToPadding" format="boolean" />
四、实现原理   在开发中经常会涉及到这种业务,一个按钮,在选中时和未选中会呈现不同的颜色样式,这种情况,通过都会创建一个 selector 的 xml 文件并通过 Shape 来设置不同状态下的相关样式,比如:
<?xml version="1.0" encoding="utf-8"?> <selector xmlns:android ="http://schemas.android.com/apk/res/android" > <item android:state_focused ="true" > <shape > <corners android:radius ="3dp" /> <stroke android:width ="1dp" android:color ="@color/white" /> <solid android:color ="@color/black" /> </shape > </item > <item > <shape > <solid android:color ="@color/red" /> <corners android:radius ="3dp" /> </shape > </item > </selector >
  顺着这个思路,若需要根据自定义属性来进行 View 焦点变化时的样式改变,只需动态创建一个类似 selector 的图片即可,刚好 Android 是有提供的,即:StateListDrawable 和 GradientDrawable ,具体介绍可以参考官方文档。顺着这个思路,就可以根据传进来的自定义属性,把相关的值设置到对应的Drawable中去,再结合 OnFocusChangeListener 进行焦点变化的控制,下面以 FocusLinearLayout 来说明:
package com.tt.focuslayer.widgetimport android.content.Contextimport android.graphics.Colorimport android.graphics.drawable.GradientDrawableimport android.graphics.drawable.StateListDrawableimport android.util.AttributeSetimport android.view.Viewimport android.widget.LinearLayoutimport androidx.core.view.ViewCompatimport com.tt.focuslayer.Rimport com.tt.focuslayer.util.dp2pxclass FocusLinearLayout @JvmOverloads constructor (context: Context, attrs: AttributeSet? = null , defStyleAttr: Int = 0 ) : LinearLayout(context, attrs, defStyleAttr), View.OnFocusChangeListener { private var isScale: Boolean = false private var scaleSize: Float = 1.1f private var cornerRadius: Float = 0f private var contentBgColor: Int = 0 private var focusContentBgColor: Int = 0 private var focusStrokeColor: Int = 0 private var focusStrokeWidth: Int = 0 init { if (attrs != null ) { val attributes = context.obtainStyledAttributes(attrs, R.styleable.FocusLayer) isScale = attributes.getBoolean(R.styleable.FocusLayer_isScale, true ) scaleSize = attributes.getFloat(R.styleable.FocusLayer_scaleSize, 1.1f ) cornerRadius = attributes.getFloat(R.styleable.FocusLayer_layerRadius, 3f ) contentBgColor = attributes.getColor(R.styleable.FocusLayer_contentBgColor, Color.parseColor("#4F6D9A" )) focusContentBgColor = attributes.getColor(R.styleable.FocusLayer_focusContentBgColor, 0 ) focusStrokeColor = attributes.getColor(R.styleable.FocusLayer_focusStrokeColor, Color.parseColor("#00BC71" )) focusStrokeWidth = attributes.getInt(R.styleable.FocusLayer_focusStrokeWidth, 1 ) attributes.recycle() } val stateListDrawable = StateListDrawable() val normalDrawable = GradientDrawable() normalDrawable.cornerRadius = dp2px(cornerRadius).toFloat() normalDrawable.setColor(contentBgColor) val focusDrawable = GradientDrawable() focusDrawable.cornerRadius = dp2px(cornerRadius).toFloat() focusDrawable.setColor(if (focusContentBgColor != 0 ) focusContentBgColor else contentBgColor) focusDrawable.setStroke(dp2px(focusStrokeWidth), focusStrokeColor) stateListDrawable.addState(intArrayOf(android.R.attr.state_focused), focusDrawable) stateListDrawable.addState(intArrayOf(), normalDrawable) this .onFocusChangeListener = this this .background = stateListDrawable this .isFocusable = true } override fun onFocusChange (v: View ?, hasFocus: Boolean ) if (v == null ) { return } if (hasFocus && isScale) { ViewCompat.animate(v).scaleX(scaleSize).scaleY(scaleSize) .translationZ(0f ).start() } else { ViewCompat.animate(v).scaleX(1f ).scaleY(1f ) .translationZ(0f ).start() } } }
  动态绘制 Shape 时,主要是涉及到了 StateListDrawable,简单理解就是 selector 节点,存放不同状态下需要显示的 item 样式,而 GradientDrawable 就相当于是各个状态下的 shape 节点,这样当当前的 View 在焦点发生变更时,就可以根据设置好的 StateListDrawable 进行样式的变更了,也就不需要在手动的去根据焦点变化,去动态改变显示的样式,全部交给 Android 系统自己去做,然后就可以省下更多时间好去陪妹子啦 :)。


